Save to Pinterest
 The first time I made these chicken cutlets, my kitchen smelled like an Italian trattoria had collided with a Japanese izakaya. I was experimenting with combining two comfort food traditions, and when that golden crust hit the hot oil, the sizzle was so satisfying my roommate came wandering in, fork in hand, before I'd even plated anything.
Last Tuesday, I made this for my sister who claimed she hated katsu because the breading always fell off. Watching her face light up when she took that first bite—the cutlet stayed perfectly crisp, the lemon brightening everything—reminded me why getting these details right matters. She asked for the recipe before she'd even finished her bowl.
Ingredients
- 4 thin chicken breast cutlets: Thin cutlets cook evenly and stay juicy, but if you can only find thick ones, pound them gently between plastic wrap until theyre about 1/4 inch thick
- 1 cup panko breadcrumbs: These Japanese breadcrumbs create this incredibly light, airy crunch that regular breadcrumbs just cant match
- 1/2 cup grated Parmesan cheese: Use freshly grated if possible—the pre-shredded stuff has anti-caking agents that prevent it from melting properly into the crust
- 1/2 cup all-purpose flour: This creates the base layer that helps the egg wash stick, so dont skip this step or your breading will slide right off
- 2 large eggs: Beat these until no streaks of white remain for the most consistent coating
- 1 tsp garlic powder: Distributes garlic flavor evenly throughout the crust without any burnt bits
- 1/2 tsp salt and 1/4 tsp black pepper: Season every layer—flour, egg, and panko—for the best flavor
- 3 tbsp olive oil: Olive oil gives a lovely flavor, but you can use vegetable or canola if you prefer a neutral taste
- 2 cups cooked white or brown rice: Short-grain rice is traditional, but whatever you have on hand works perfectly fine
- 2 cups fresh arugula: The peppery bite cuts through the rich, crispy chicken beautifully
- 1 large lemon: Fresh lemon juice is absolutely essential here—it transforms the whole dish from good to extraordinary
Tired of Takeout? 🥡
Get 10 meals you can make faster than delivery arrives. Seriously.
One email. No spam. Unsubscribe anytime.
Instructions
- Get your rice going first:
- Start cooking the rice according to package instructions so its ready and waiting when the chicken comes out of the pan
- Set up your breading station:
- Arrange three shallow bowls in order: flour mixed with garlic powder, salt, and pepper; beaten eggs; then panko mixed with Parmesan
- Coat the cutlets:
- Press each chicken cutlet firmly into the flour mixture, shake off excess, dip in egg wash, then really press the panko-Parmesan mixture onto both sides so it sticks
- Fry until golden:
- Heat oil in a large skillet over medium heat and cook each cutlet for 3 to 4 minutes per side until deep golden brown and cooked through
- Rest and slice:
- Let the cutlets rest on paper towels for a minute to drain excess oil, then slice into strips
- Assemble your bowls:
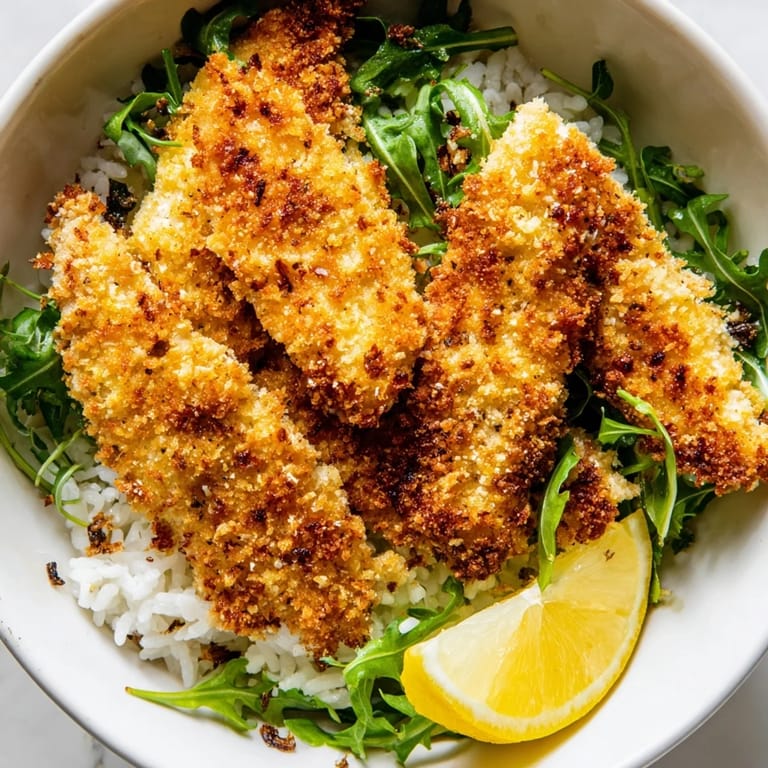
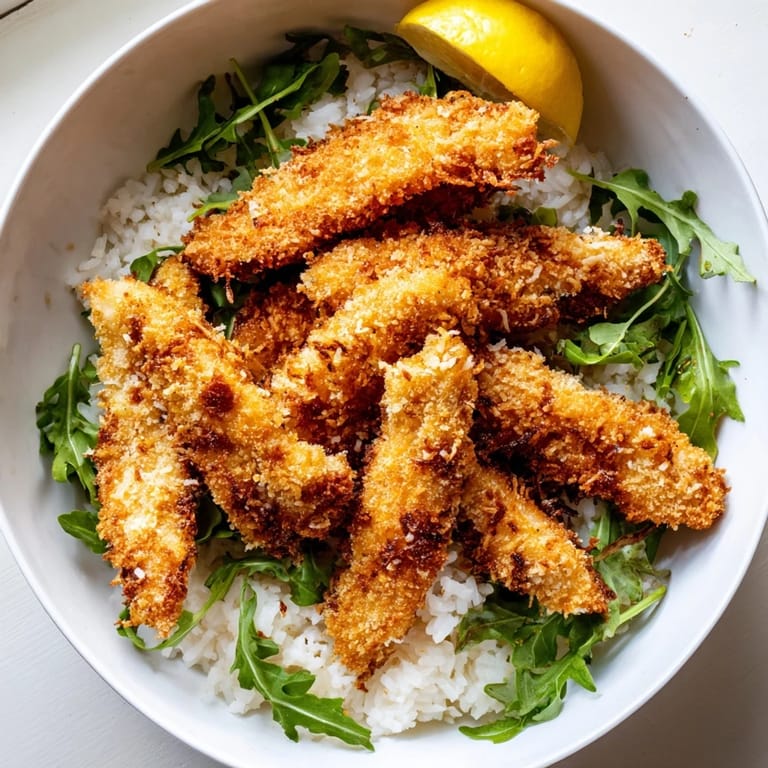
- Divide warm rice among four bowls, top with a handful of arugula, arrange sliced chicken on top, and finish with lemon wedges
 Save to Pinterest
 This recipe became my go-to comfort food during a particularly stressful month at work. Something about assembling these beautiful bowls—warm rice, crispy chicken, fresh greens—felt like a small act of self-care, and eating them was even better.
Making It Your Own
Sometimes I swap the arugula for baby spinach when I want something milder, and in summer I've been known to add thinly sliced cucumber for extra freshness. The beauty of this bowl is how it adapts to whatever's in your crisper drawer while still feeling cohesive.
Sauce Conversations
While fresh lemon juice is traditional, I've served this with everything from homemade tonkatsu sauce to a simple yogurt-garlic drizzle. My friend who hates mayonnaise fell in love with a light tahini-lemon dressing I improvised once, so feel free to experiment.
Leftovers and Make-Ahead Magic
The cutlets reheat surprisingly well in a toaster oven at 375°F for about 8 minutes, though they won't be quite as crispy as fresh. I've also breaded the chicken ahead and stored it between parchment paper in the fridge, frying it straight from the fridge—just add an extra minute per side.
- If meal prepping, store rice, chicken, and arugula in separate containers and assemble when ready to eat
- The breading mixture can be made up to 3 days ahead and kept in an airtight container
- Freeze uncooked breaded cutlets between layers of parchment for up to a month—thaw before frying
 Save to Pinterest
 Theres something deeply satisfying about a meal that feels elegant and comforting all at once. I hope this recipe finds its way into your regular rotation, just as it has in mine.
Recipe FAQs
- → How do I keep the chicken cutlets crispy?
Ensure your oil is hot enough before frying—it should shimmer and be around medium heat. Don't overcrowd the skillet, and fry each cutlet 3-4 minutes per side until golden. Drain on paper towels immediately after cooking to remove excess oil.
- → Can I prepare the cutlets ahead of time?
Yes, you can bread the cutlets several hours in advance and refrigerate them on a plate. Fry them just before serving for maximum crispness. The rice and greens can also be prepared ahead and assembled when ready to eat.
- → What's the best way to pound the chicken cutlets?
Place chicken between two sheets of plastic wrap or parchment paper. Use a meat mallet or rolling pin to gently pound until about 1/4-inch thick. This ensures even cooking and faster preparation time.
- → Can I use a different breading for the chicken?
Absolutely. Try panko alone for extra crunch, or mix in Italian seasoning, paprika, or dried herbs. You can also substitute panko with crushed cornflakes or nuts for texture variation.
- → What sauce pairs well with this dish?
Tonkatsu sauce is traditional, but a light yogurt dressing, lemon aioli, or even a drizzle of balsamic glaze works beautifully. A simple mix of soy sauce and lime juice also complements the Asian-inspired bowl nicely.
- → How should I store leftovers?
Store chicken and rice separately in airtight containers for up to 3 days. Reheat chicken in a 350°F oven to restore crispness. Keep greens and lemon separate until serving to maintain freshness and texture.