 Save to Pinterest
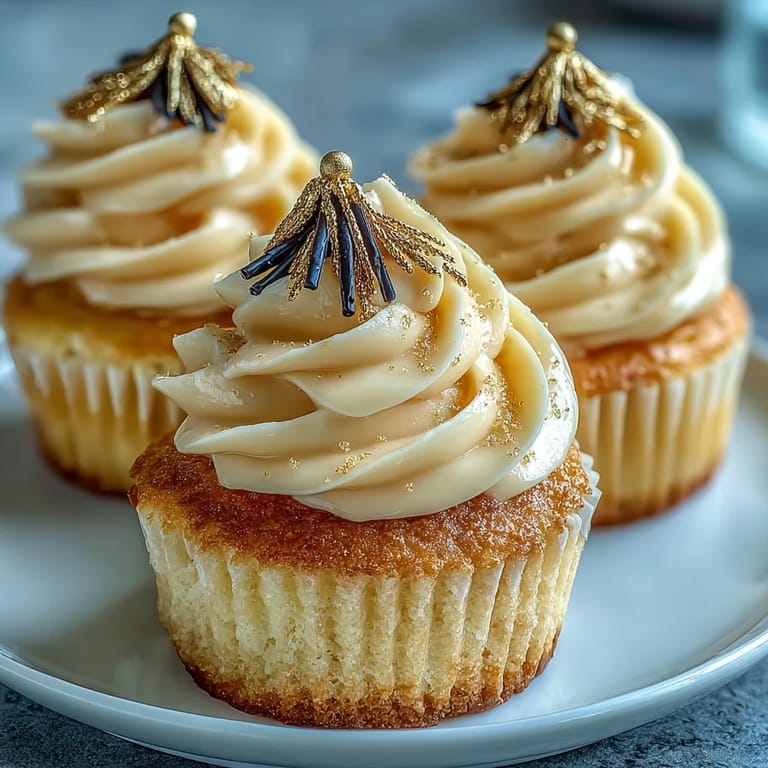
 The first thing that hits me when baking these graduation cupcakes is the unexpected calm in my kitchen, a quiet hum as the butter blends into sugar and anticipation. I never planned on being the family’s unofficial baker, but these festive cupcakes have earned me that title more than once. One batch started on a rainy afternoon with music echoing off the tile, and by the end my counters glimmered with stray gold fondant dust. There is something about sculpting those tiny caps that makes the ordinary afternoon feel outright celebratory. These cupcakes emerged from playful hands and flour-dusted laughter, not just recipes.
Last June, we had four graduates across the cousins, so I roped everyone in to roll fondant ropes for tassels, even my persnickety uncle who rarely cooks. Witnessing the cupcakes come together—each cap a little unique, each swirl of buttercream a little imperfect—felt like a celebration in itself. When my niece declared her cap the prettiest and showed it off before taking a bite, I realized the decorations were half the fun. We ended up with smudged aprons and some lopsided hats, but no one seemed to mind. It’s these goofy kitchen moments that make the cupcakes taste a little sweeter.
Ingredients
- All-purpose flour: Use a fresh, fluffy scoop—compacts less and keeps cupcakes light.
- Baking powder: The lift is subtle but critical; I double-check the date for best results.
- Salt: Just a pinch sharpens flavors and balances the sweetness.
- Unsalted butter: Softened but not melted is the trick for the creamiest crumb in the cake and smoothest frosting.
- Granulated sugar: I always let it mix long enough to turn airy, helping with texture and rise.
- Eggs: Room temperature eggs blend better—I set mine out while prepping other ingredients.
- Vanilla extract: The aroma lingers through the house and signals something truly celebratory.
- Whole milk: Adds moisture and richness; don’t swap for water.
- Powdered sugar: Always sifted for a clump-free, cloudlike buttercream.
- Black fondant: Dust with minimal cornstarch to prevent sticking and keep the color vibrant.
- Gold fondant: Works best when slightly kneaded to soften; it’s surprisingly easy to roll out thin ropes.
- Edible gold dust (optional): Just a brush adds magical sparkle—really impresses guests.
- Cornstarch (for rolling): A scant tablespoon keeps fondant from sticking to the counter or your hands.
- Edible adhesive or water: You only need a tiny dab to fasten fondant pieces securely.
Tired of Takeout? 🥡
Get 10 meals you can make faster than delivery arrives. Seriously.
One email. No spam. Unsubscribe anytime.
Instructions
- Prep the oven:
- Let’s preheat to 350°F (180°C) and line your trusty muffin tin—cupcake liners make everything prettier and easier.
- Mix the dry base:
- Whisk flour, baking powder, and salt in a big bowl—the whisking itself makes you feel halfway done already.
- Cream & blend:
- Use an electric mixer to cream butter with sugar until pale and fluffy; don’t rush, this step gives you that perfect tender crumb.
- Add eggs & vanilla:
- Crack in eggs one by one, mixing well, then splash in vanilla extract for that instant bakery smell.
- Combine & finish batter:
- Alternately add flour mixture and milk, gently folding—stop when just combined, because overmixing leads to dense cupcakes.
- Fill & bake:
- Spoon the batter into lined tins, about two-thirds full, and bake for 18–20 minutes; your kitchen will fill with vanilla and hope.
- Cool completely:
- Wait patiently until cupcakes are fully cool before icing—this part tests my willpower every single time.
- Make buttercream:
- Beat softened butter, powdered sugar, milk, vanilla, and a pinch of salt until pillowy; taste it at least once, for quality control of course.
- Frost the cupcakes:
- Pipe or swirl frosting high—don’t worry about perfection, the fondant caps hide all sins.
- Shape fondant tops:
- Roll black fondant on cornstarch-dusted counter; slice out 12 neat squares about 1.5 inches each for the top of each hat.
- Form the cap bases:
- Roll tiny black fondant balls, flatten, then attach a square on top with a dab of edible adhesive or just water pressed gently.
- Create tassels & finish:
- Roll gold fondant into thin ropes for tassels and shape a button; attach both and dust with gold if using—for shine that screams celebration.
- Decorate & serve:
- Perch a fondant cap on each cupcake and stand back—these look as joyful as they taste.
 Save to Pinterest
  Save to Pinterest
 During one party, my sister called these the cupcakes that outdressed the guests. When I saw a group of teens posing with cupcakes instead of diplomas, it struck me how these treats turn an everyday table into a memory-making scene.
Fondant Decorating Tricks From Experience
Getting sharp corners on the fondant cap tops takes patience—if the fondant sticks, add a touch more cornstarch but not too much or it’ll dull the finish. I like using a butter knife to trim sides square, scoring ever so gently to avoid tearing. Don’t stress if a tassel looks wonky; guests assume it’s intentional artistry. The small imperfections just add to their homemade charm. My favorite part is brushing on edible gold dust—it transforms them from fun to showstopping.
Keeping Cupcakes Fresh and Tasting Perfect
Once the cupcakes are decorated, I store them in a roomy container so the caps aren’t squished. If you have leftovers, stash them in the fridge but let them come to room temperature before serving for the buttercream to soften. The fondant holds up beautifully, keeping its shine overnight. These cupcakes are also easy to make ahead—I’ve assembled all decorations the night before with no regrets. Just don’t let humidity sneak in or the fondant can get sticky fast.
Easy Swaps and Trouble-Free Variations
If you’re tempted by chocolate, the recipe swaps in cocoa powder for part of the flour without fuss. Dairy-free? I’ve pulled off a batch with plant butter and oat milk and no one noticed. Don’t have gold fondant—yellow works in a pinch, or dust a little more of that shimmer for luxury. Cupcake size can be made mini for larger gatherings, just trim the baking time shorter.
- Work on a cool counter to keep fondant from going soft.
- If you over-mix the batter, add an extra tablespoon of milk to loosen.
- Prep all your decorations before baking; it saves a last-minute scramble.
 Save to Pinterest
  Save to Pinterest
 However you celebrate—with confetti or just a quiet cup of coffee—these cupcakes bring a burst of cheer to any table. Here’s to sweet endings and new beginnings, all in a swirl of buttercream.
Recipe FAQs
- → How do I keep fondant from sticking while rolling?
Dust the work surface lightly with cornstarch and rotate the fondant frequently. Use a soft scraper to lift pieces and avoid stretching thin edges.
- → What’s the best way to get smooth buttercream?
Beat softened butter until pale and fluffy, then add sifted powdered sugar gradually with a little milk and vanilla. Finish on medium-high speed to remove air and achieve a silky texture.
- → Can these be prepared ahead of time?
Yes. Bake cupcakes a day ahead and keep in an airtight container. Pipe buttercream and add fondant caps just before serving to preserve texture and shine.
- → How do I make a shiny gold finish on the caps?
Brush a light layer of edible gold dust over the gold fondant details. For extra sheen, use a damp brush sparingly or an edible glaze designed for fondant.
- → Are there easy swaps for dietary needs?
Use dairy-free butter and plant milk for a vegan option, and choose egg replacer for the batter. Check fondant labels for allergen-free versions when needed.
- → How thick should the fondant squares and bases be?
Roll fondant to about 1/8 inch (3 mm). Cut 1.5 inch (4 cm) squares for the caps and form bases slightly flattened so the square sits securely when attached.