 Save to Pinterest
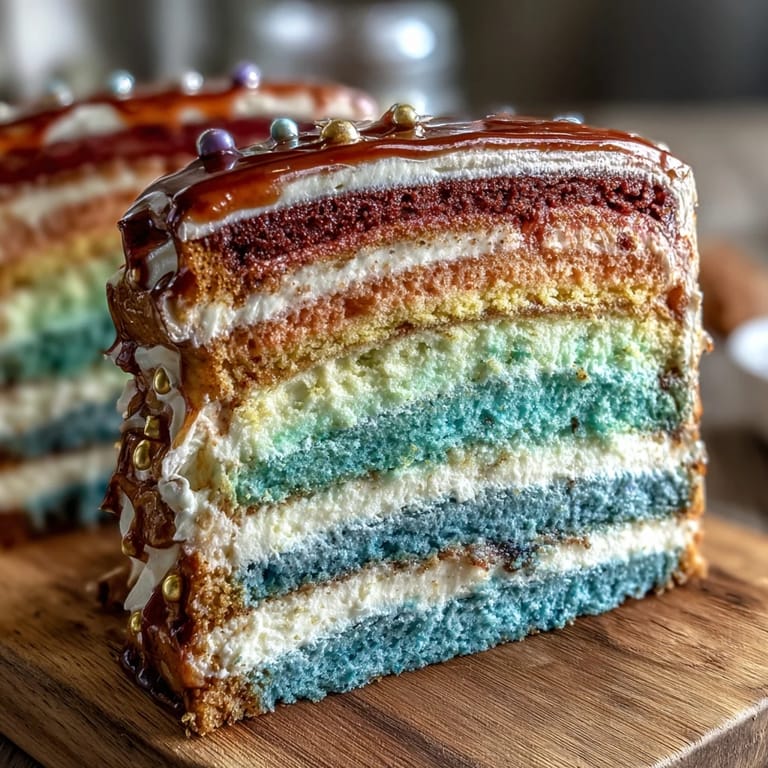
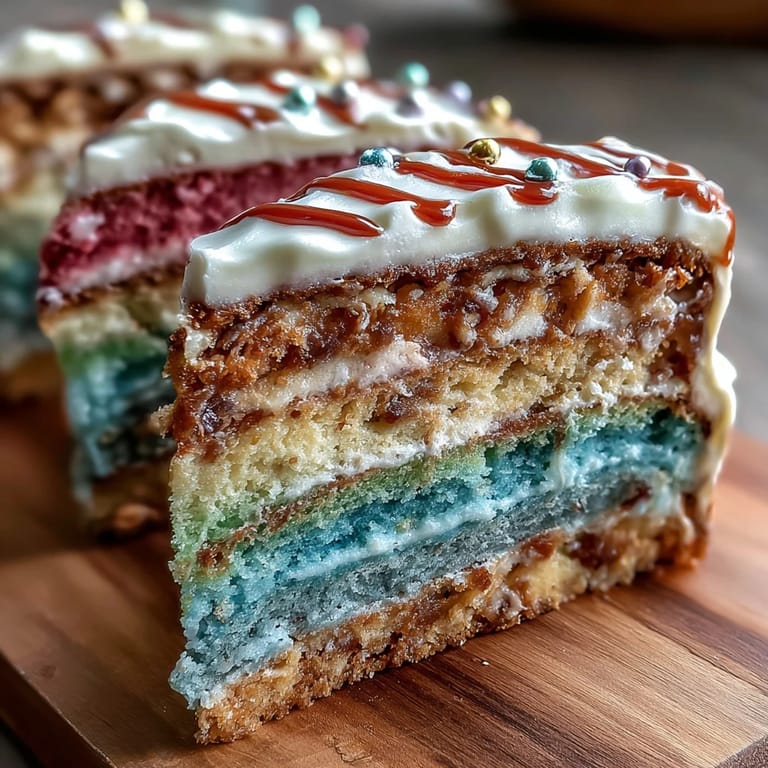
 My cousin texted me three weeks before her graduation with a single request: make me something that looks as exciting as I feel. She wanted ombre, she wanted layers, and she wanted it to feel like a celebration before the actual ceremony even happened. I'd never attempted four synchronized cake layers before, but standing in her kitchen that morning with her color swatches spread across the counter, I realized this wasn't just about baking—it was about turning her emotions into something edible and beautiful.
I'll never forget the moment my cousin walked into her own graduation party and just stopped in the doorway. The cake was sitting there in full ombre glory—navy to sky blue to pale cream—and her eyes went wide. She didn't even cut into it right away; she just sat there taking pictures, and I realized that sometimes the most meaningful part of cooking for someone is watching them understand that you made something specifically for them, not just something edible.
Ingredients
- All-purpose flour (3 1/4 cups): Use a scale if you have one; volume measurements can shift, and precision matters when you're dividing batter into four separate colored batches.
- Baking powder (2 1/2 tsp) and salt (1/2 tsp): These create structure and lift, making sure each colored layer rises evenly so your ombre doesn't collapse mid-bake.
- Unsalted butter (1 cup) and granulated sugar (2 cups): Room temperature is non-negotiable here—cold butter won't cream properly, and your cake will be dense instead of tender.
- Large eggs (4) at room temperature: Cold eggs won't incorporate smoothly into the creamed mixture, which means you'll end up with a grainy texture that no amount of frosting can fix.
- Vanilla extract (1 tbsp): Use real vanilla; the imitation stuff will taste hollow against the delicate crumb of this cake.
- Whole milk (1 1/4 cups) at room temperature: The alternating flour-and-milk method keeps the batter from overworking, which protects the tender crumb you're aiming for.
- Gel food coloring: Gel is essential because liquid coloring adds moisture and muddles your colors; gel lets you create rich, true tones without thinning the batter.
- Egg whites (6 large) for buttercream: Swiss meringue requires pasteurized eggs or raw eggs brought to 160°F over a double boiler for food safety—don't skip this step.
- Granulated sugar (1 1/2 cups) and unsalted butter (1 1/2 cups) for frosting: Softened butter is crucial for silky buttercream; if it's too cold, you'll end up with a broken, greasy mess.
Tired of Takeout? 🥡
Get 10 meals you can make faster than delivery arrives. Seriously.
One email. No spam. Unsubscribe anytime.
Instructions
- Set your mise en place:
- Preheat your oven to 350°F and grease four 8-inch round pans with parchment paper rings on the bottom. Having everything measured and ready before you start mixing means you won't be caught off guard when the batter is ready to go.
- Build your dry mixture:
- Whisk flour, baking powder, and salt in a medium bowl until evenly combined. This distributes the leavening agents so every colored layer rises at the same rate.
- Cream the butter and sugar:
- In a large bowl, beat softened butter and sugar together for about 3 minutes until the mixture looks pale and fluffy, like wet sand turning into clouds. This aeration is what gives the cake its tender crumb.
- Incorporate eggs and vanilla:
- Add eggs one at a time, letting each one fully blend before adding the next, then mix in the vanilla extract. This slow incorporation prevents the batter from looking curdled or separated.
- Alternate your wet and dry:
- Starting and ending with the flour mixture, gently alternate adding the dry ingredients and milk to your butter mixture, stirring just until combined. Overmixing develops gluten and toughens the cake.
- Divide and tint for ombre:
- Split the batter evenly into four bowls, then add increasing amounts of gel food coloring to each bowl—the first stays lightest, and each successive batch gets darker. Stir gently until the color is even throughout.
- Fill your pans:
- Pour each colored batter into its prepared pan and smooth the tops so they bake evenly. Pour from the center outward to avoid air bubbles.
- Bake until golden:
- Bake for 22–25 minutes until a toothpick inserted in the center comes out clean and the tops are lightly golden. Don't open the oven door for at least 20 minutes, or you risk deflating the cakes.
- Cool with patience:
- Let the cakes rest in their pans for 10 minutes (this sets the structure), then turn them out onto wire racks to cool completely. Rushing this step leads to broken layers and frustration.
- Make your swiss meringue buttercream:
- Combine egg whites and sugar in a heatproof bowl over simmering water, whisking constantly until the mixture reaches 160°F and the sugar completely dissolves. This pasteurizes the eggs and creates a smooth base for buttercream.
- Whip into clouds:
- Transfer the warm mixture to a mixer and whip on high speed for about 10 minutes until stiff peaks form and the mixture cools to room temperature. You'll see the transformation happen—it goes from glossy and loose to billowing and pale.
- Add butter carefully:
- Add softened butter a few cubes at a time, mixing well between additions. If the buttercream breaks or looks greasy, keep mixing on medium speed; it usually comes back together as the temperature evens out.
- Finish with vanilla and color:
- Mix in vanilla extract, then divide the buttercream and tint portions with gel food coloring to match your cake layers. You can keep one portion white for blending.
- Assemble your masterpiece:
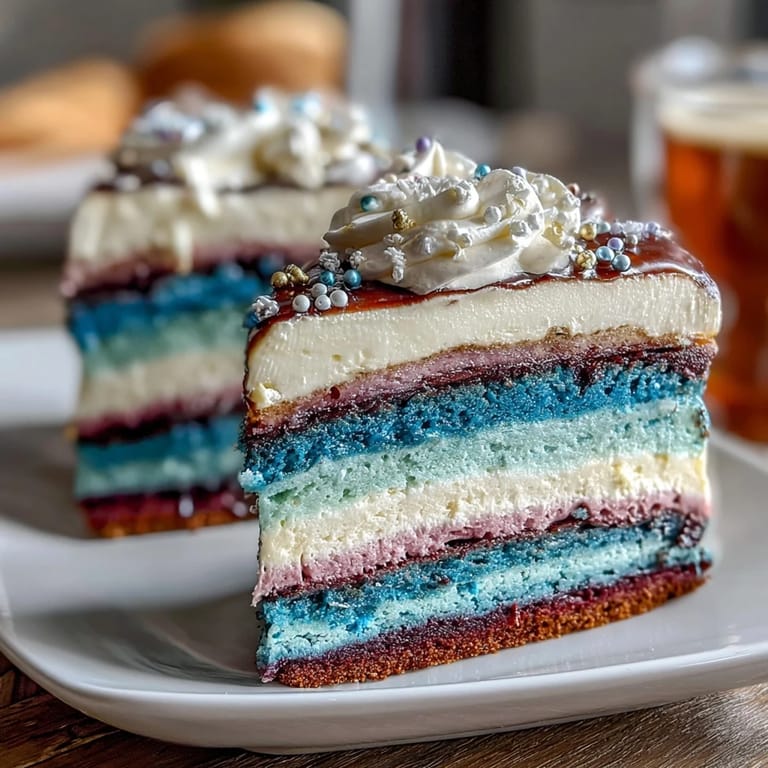
- Place the darkest cake layer on a cake stand or plate, spread it with buttercream, and repeat with the remaining layers, arranging them from darkest to lightest. This creates the classic ombre effect.
- Apply a crumb coat:
- Spread a thin layer of buttercream over the entire assembled cake and chill for 20 minutes. This seals in crumbs so your final frosting looks pristine.
- Frost and decorate:
- Apply the final layer of buttercream, blending colors vertically or creating stripes as you go. Chill until set, then add edible pearls, a graduation topper, or piped details.
- Rest before serving:
- Bring the finished cake to room temperature before slicing so the buttercream is soft and the crumb is tender. Cold cake tastes muffled and dense.
 Save to Pinterest
 The best part of that graduation party wasn't watching people eat the cake, though they did, and they raved about it. It was my cousin leaning over and whispering that she was keeping one of the layers frozen so she could have a piece on the first day of her new job, like a little reminder of everyone who celebrated her that day.
The Ombre Effect Explained
Creating an ombre effect isn't about magical baking skills—it's about simple math and gel food coloring. Divide your batter into four equal portions, then add coloring in increments: nothing to the first bowl, a small amount to the second, more to the third, and the most to the fourth. The key is consistency within each color, not perfection across them.
Why Swiss Meringue Buttercream Wins
American buttercream is easier, but Swiss meringue is worth the extra effort on a cake this special. It's less sweet, has a silkier texture, and holds sharp piping details without sagging. The heating step also means you're working with pasteurized eggs, which feels safer when you're making something for a crowd.
Timing and Make-Ahead Magic
You can bake the cake layers up to three days ahead and store them wrapped tightly in plastic wrap at room temperature, or freeze them for up to a month. The buttercream can be made a day in advance and refrigerated; bring it to room temperature and give it a quick whip before frosting. Assemble the cake the morning of the party so the buttercream sets properly and the layers stay sturdy.
- Freeze unfrosted cake layers wrapped tightly in plastic wrap for up to a month, then thaw at room temperature before frosting.
- Make buttercream up to 24 hours ahead and refrigerate in an airtight container; re-whip briefly before using to restore texture.
- Assemble and frost the cake no more than 8 hours before serving so the buttercream sets and the layers don't shift.
 Save to Pinterest
 This cake exists because someone you care about is moving into the next chapter of their life, and you want to mark that moment with something beautiful and delicious. That's what makes the extra effort worth it.
Recipe FAQs
- → How is the ombre effect achieved in the layers?
The batter is divided into four portions, each tinted with increasing amounts of gel food coloring to create a smooth gradient from dark to light shades.
- → What is Swiss meringue buttercream and why use it?
Swiss meringue buttercream is made by gently heating egg whites and sugar, then whipping to stiff peaks before adding softened butter, resulting in a silky, light frosting that holds shape well.
- → Can I prepare the layers ahead of time?
Yes, layers can be baked and cooled in advance, then wrapped and refrigerated. Bring to room temperature before assembling and frosting.
- → What tools are essential for assembling this cake?
Four 8-inch cake pans, mixing bowls, an electric mixer, an offset spatula, piping bags, and cooling racks are recommended for smooth preparation and decoration.
- → How should I store the finished layered cake?
Store the cake chilled to maintain buttercream firmness. Remove from the fridge about 30 minutes before serving for best texture and flavor.
- → Are there any allergens to be aware of?
This cake contains eggs, milk, butter, and wheat (gluten). Always check food coloring and decoration labels for additional allergen information.